The Implementation Specialists & VR Consultant team welcomes you to Avantio Academy.
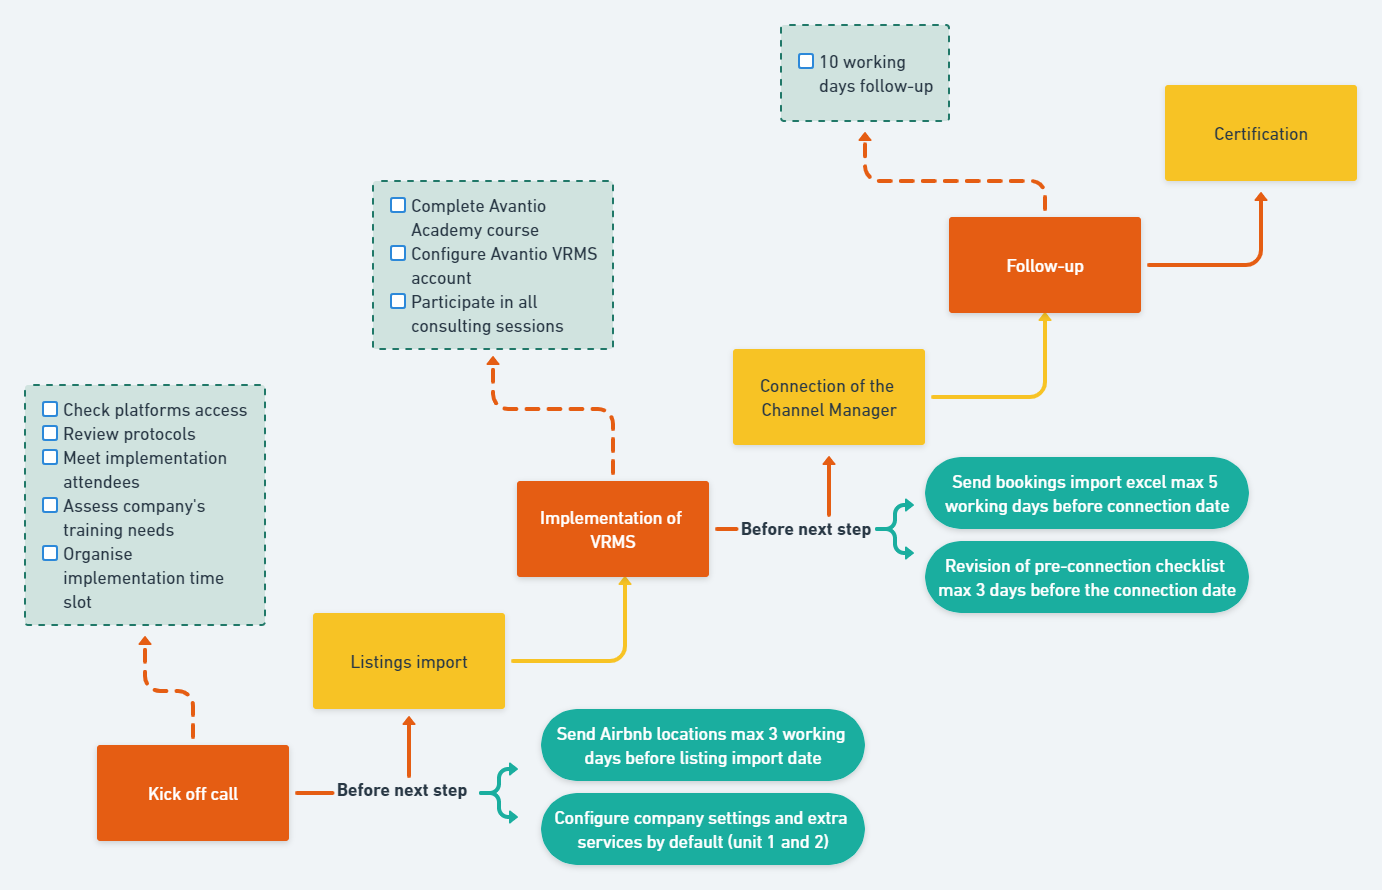
During the next few weeks you will have to configure your VRMS account. Before we begin, we will explain the process:
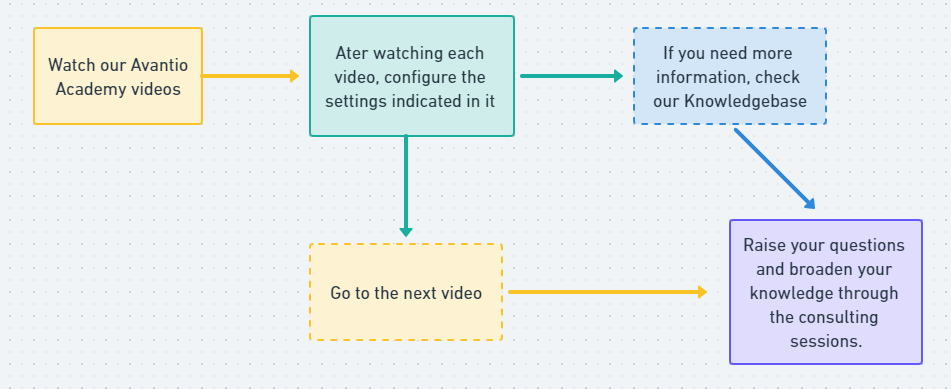
1- Through the Avantio Academy platform, you will find the complete course to configure your VRMS account.
- You will have to make the configurations as you finish the units of the course.
- After each unit, you will have to take a test.
- When you complete each step, we will indicate the tasks you will have to perform in the system.
2- You will also be supported with the complete guides of each section in our knowledge base.
3- One of our consultants will follow up the implementation of the account through consulting sessions in which you will be able to clarify doubts and expand your knowledge about Avantio and the sector.
The person responsible for your implementation will request an initial meeting to establish the implementation time window and plan the sessions. Please check our protocol for more information.
Remember that all users using the Avantio account must participate in this process in order to have technical support after the implementation of the system.
Do not hesitate to contact the person responsible for your implementation if you need more information.
Best regards,
Implementation Specialist & VR Consultant Team
For a successful implementation, you will have to follow the steps indicated at each stage of implementation
Below you will find a list of tasks and deliverables that you will have to perform during the implementation process.
You will have to perform the configurations indicated in the tasks by following the Avantio Academy course. In addition, you will be supported by our documentation page.
During the follow-up sessions with the implementation manager, the completion of the tasks will be verified, possible errors will be corrected and possible doubts will be clarified.
The tasks and deliverables are the minimum requirements to be able to realise the connections to portals and websites. In case of non-implementation or incorrect implementation of these tasks, the connection to the portals will not be possible. In case of delay of the deliverables, penalties may be applied to the implementation:
| Section | Task |
| Company Configuration | - Add the logo - Setup the company languages - Setup the company emails - Validate the email domain - Add the GDPR (if needed) |
| Legal name and Invoice details | - Legal Entity Name - Tax ID number - Main contact (name and email) - Company adress (street name, number, post code, city and country) - Phone number without the prefix - Bank details (if needed for bank transfer payments) |
| Extras by default | - Configuration of the default extras required in the properties - Configuration of the usage, price, tax, date of payment, application date and person responsible for the managment of the service (if needed) |
| Accomodations / Photos and Descriptions | - Type (appartment, villa, studio...) - Category (capacity) - Location of the accomodation (country, state or region, province, city, street type, street name, number and postcode) - Property surface - Number of bedrooms and beds ditsribution - Maximum capacity - Occupation withou supplement (if applicable) - Number of bathrooms - Number of kitchens - Photo gallery - Photo gallery name (title of the listing) with more than 20 characters - Customised descriptions - Labels on the photos |
| Rates | - Rates setup minimum 1 year in advance (no gaps in the set rate) |
| Booking conditions | - Percentage for each stage and payment methods available - Secure payment gateway integration - Cancellation policies (only for web) |
| Key collection | - Opening hours - Check-in time - Check-out time - Key collection adress - Person responsible for the key collection - Email of the person responsible for the key collection |
| Occupancy rules | - Occupancy rules setup minimum 1 year in advance (no gaps in the set rules) |
| Bookings | - All future bookings must be inserted manually or via the booking import*. |
Portals specific conditions:
| Portal | Condition |
| VRBO | Photo gallery title (listing title) with minimum 20 characters |
| VRBO | Customised descriptions |
| Booking.com | Legal Entity ID Code. If you do not have this code, you will need to request it from the Booking.com team. |
| Booking.com | Cancellation Policy. Check here for available cancellation policies |
| Booking.com | VAT to be applied to the accommodation. |
* If you have contracted the booking import service, you must follow the steps indicated in the document provided by the person responsible for the implementation.
Throughout your relationship with Avantio you will be able to consult all the information you need in our Knowledgebase. Here you will find all the details related to the tools and functionalities of our system, connections and news.
You will receive an email from our "Altassian" platform, and you will have to follow the steps below:
Company configuration
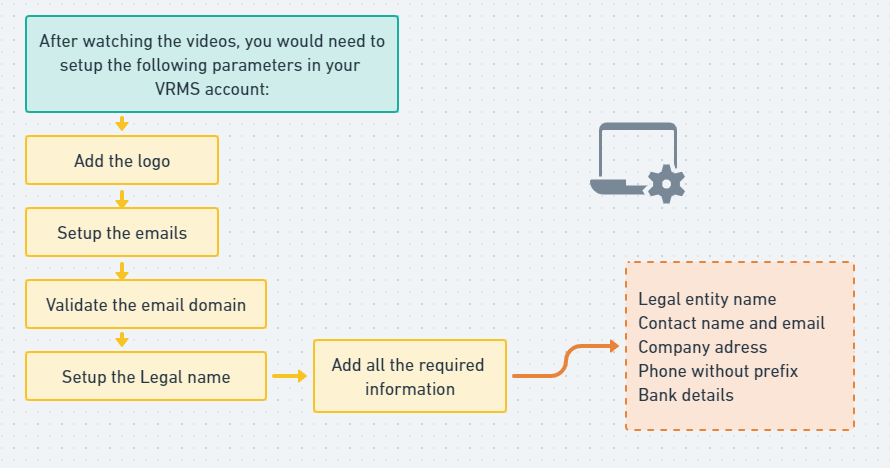
In this first stage you must enter all your company's details in order to start working with the Avantio system.
You will have to configure the following parameters:
- Attach your company logo
- Configure the company's languages
Follow the video to make the corresponding configurations:
You will have to configure the following parameters:
- Configure theemails to which reservations, requests for information and/or sales should be sent, as well as the contact details.
- Validate the domain of the emails you are going to use to send communications through Avantio. Remember that the configured emails must have a corporate domain.
- Add the text about theGDPR data protection regulations (this will be displayed in the signature of your emails).
Follow the video to make the corresponding configurations:
By validating the domain, the emails you send through Avantio will reach your customers with the domain of your agency, so if you do not validate it, the sender will be notifications@avantio.com, adding the inconvenience that the customer's response will never reach your inbox. In addition, your emails may end up in Spam and your customers may not receive important booking information.
You will have to validate your domain before finishing the training process, so we recommend you to do it as soon as possible. You will find below the steps to validate your domain.
It is a simple step, however if you are not able to do it, you can ask a technician to do it for you. If you do not have a technician to perform the steps and you can not do it yourself, our team can validate your domain for you.
This service has a nominal cost of 30€ that you will have to accept by mail to onboarding@avantio.com requesting that our team validate your domain and indicate the site where thedomain is hosted, user and password to access it.
After our team validates your domain you will have to change the password to access the site where your domain is hosted, as the Avantio team will not be responsible for any changes made after the domain validation.
Instructions
1. Create the following TXT/SPF registry in your DNS zone:
|
Domain |
|
*|YOUR DOMAIN HERE|* |
|
Type of Pointer |
|
TXT o SPF |
|
Value |
|
v=spf1 include:spf.mandrillapp.com ?all |
If you already have a SPF registry created, be sure to modify it to add our senders:
"include:spf.mandrillapp.com ?all"
2. Then, you must create another registry type TXT/DKIM with the following content:
|
Domain |
|
mandrill._domainkey.*|DOMAIN|* |
|
Type of Pointer |
|
TXT o DKIM |
|
Value |
|
v=DKIM1; k=rsa; p=MIGfMA0GCSqGSIb3DQEBAQUAA4GNADCBiQKBgQCrLHiExVd55zd/IQ/J/mRwSRMAocV/hMB3jXwaHH36d9NaVynQFYV8NaWi69c1veUtRzGt7yAioXqLj7Z4TeEUoOLgrKsn8YnckGs9i3B3tVFB+Ch/4mPhXWiNfNdynHWBcPcbJ8kjEQ2U8y78dHZj1YeRXXVvWob2OaKynO8/lQIDAQAB; |
You will have to configure the following parameters:
- Automatic change of the cleaning status
- Contact details
- Configure the colors of the reservation statuses in the Avantio system.
You must configure the company name with the fiscal data of your company:
- Name and Tax ID number of the company
- Company contact person and email
- Company address and phone number (without prefix)
- Default VAT of the company
Follow the video to make the corresponding configurations:
This section allows you to add users to the system and give them access to the software with different permissions.
In this way you can separate by departments or responsibilities within the company the access that employees will have to the software.
Each user can see and edit only what concerns him in his daily tasks, depending on the department he works in and his position.
More sensitive information or data will be available only to those with more advanced access. Maximize security and minimize errors.
It is possible to assign a single role or multiple roles to the same user. Whoever has administrator permissions can create new users, who will either be administrators or have restricted permissions.
Follow the video to make the corresponding configurations:
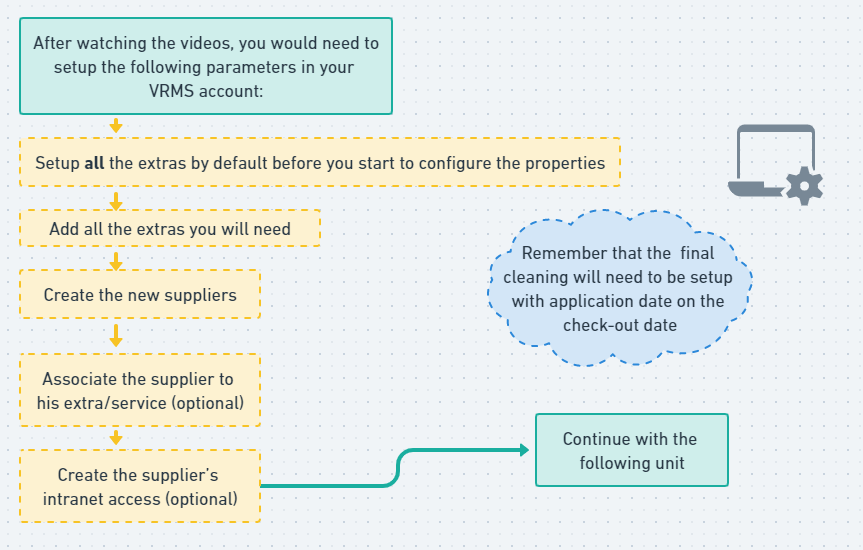
By extra services we mean all additional services in addition to the hosting service.
You will need to configure the default extras before configuring the accommodations. Once you have configured the default extra, you will be able to customise information per accommodation such as price or other conditions.
The extras already provided by the system you will only have to edit them but if you need to, you can also create new extras that are not created by default in the system.
Follow the video to make the corresponding configurations:
Remember to configure your extras and services before creating your accommodations as this way, some of the information will be configured by default and it will be easier and faster to configure your accommodations.
In addition, there are characteristics of the accommodations that are directly related to the extas (for example, internet access).
Follow the video to make the corresponding configurations:
In case a service has different conditions depending on the accommodation, you will have to configure by default some conditions and once the accommodation is created, you will be able to customise these conditions (for example, the price of the final cleaning).
Follow the video to make the corresponding configurations:
In case you do not find, in the extras provided by the system, an extra that you want to offer to your customers, you will have to create it.
Remember that, if you want the extra to be visible to tourists on portals and websites, you should check the compatibility of the extras and services with the portals in our documentation.
Follow the video to make the corresponding configurations:
Access to suppliers is a tool that allows you to enter all the details of the suppliers of services and/or products external to your company.
To configure this tool correctly, you must first create the suppliers and fill in all the necessary data in their file.
Follow the video to make the corresponding configurations:
Once you have created the supplier's file, you can assign it to its services in different ways:
In the supplier's file: when the supplier has no services assigned, you can click on the "Assign" button that will appear in the supplier's file. In the panel that will appear on the right side of the screen, you will find all the services and you will be able to assign the provider to one or several services at the same time.
In the default extra: In the list of default services and extras you can also assign the provider to a service by entering the service and assigning the provider in the "Provider" section.
In the accommodation file: if the provider you have created only provides services in specific accommodations, you can assign the provider to the accommodations you want by entering the accommodation file, in the "Extras/Services" section.
Follow the video to make the corresponding configurations:
Through access to the supplier's intranet, your suppliers will be able to see relevant information related to their services in real time.
On their intranet they will be able to view the service to be performed, the accommodation corresponding to the service with a direct link to the accommodation address on Google Maps, messages to be read and the status of the service.
They can also change the status of the service and start a new conversation with the agency about a specific service.
Depending on the permissions given, the supplier will be able to see more or less information about the tourist.
The supplier will be able to install a Web App from any mobile device to make it easier to access their services.
Follow the video to make the corresponding configurations:
Notifications to suppliers allow us to improve the communication with your service suppliers, to avoid errors in communication and management, and to save the agency time. Your suppliers will always be aware of any updates in the services assigned to them and they will have a better task management experience.
Follow the video to make the corresponding configurations:
In this section you can create a new accommodation and add all of the characteristics of the property.
It is important to add as much information as possible to ensure your listing is complete and to optimize its position online and on the portals.
We can add an accommodation from the accommodations tab under the list of accommodations by clicking “new accommodation”
We must add the basic accommodation information, such as the type, rooms, characteristics, distances, etc. and fill in all the sections correctly.
In case you have contracted the Airbnb listing import service, we recommend you to add at least 1 accommodation to learn about the process.
Follow the video to make the corresponding configurations:
Add all the characteristics of your accommodation to have a complete listing and get more bookings.
You should enter the following data to avoid errors with the portals:
- Type of accommodation (appartment, house, etc.)
- Verified location
- Square metres of the accommodation
- Capacity of the accommodation
- Distribution of beds
- Bathrooms/toilets and kitchens
Remember that you have a section of additional features where you will find all kinds of features to make your ad even more complete.
Follow the video to make the corresponding configurations:
In case a service has different conditions depending on the accommodation, you will have to configure by default some conditions and once the accommodation is created, you will be able to customise these conditions (for example, the price of the final cleaning).
Follow the video to make the corresponding configurations:
In this section, you will be able to send additional infromation to your website and some portals.
Don't forget to add the Type: Ideal for families or Ideal for kids.
Follow the video to make the corresponding configurations:
A good photo gallery can help you increase your bookings by up to 50%, so we recommend that you give this section plenty of attention.
Follow our recommendations to ensure your listings are optimised.
Remember if your photos must meet the minimum format requirements to be uploaded to the Avantio platform.
Don't forget to tag your photos to increase visibility on the portals.
The system by default creates a description for each property in the languages available on your account based on the features configured on the accommodation tab, but we recommend customizing the descriptions in all languages.
You should always customize the description at least in the main language of your agency e.g English.
Follow the video to make the corresponding configurations:
Now that you have created your photo galleries, you can manage them to optimise your ads.
The system will help you to optimise your gallery with smart actions when there are less than 75% of photos tagged in the gallery, when there are any photos that are of poor quality, when there are less than 20 photos in the gallery, or when there are predefined descriptions.
Also, remember that you can set up a gallery name with keywords for each language available in your VRMS account to attract more visitors to your listings.
Follow the video to make the corresponding configurations:
This option allows you to add a vimeo or youtube video to the photo gallery on your Avantio website.
First of all, you should inform us that you wish to add videos to your photo galleries and we will activate this option for you.
Follow the video to make the corresponding configurations:
The 3D Virtual Tour is a tool that allows guests to visit the accommodation virtually (indoors and outdoors) when viewing th eproperty on the agency's website.
This will convey a professional image of your business, and it will generate more confidence and transparency for the guest.
If you are interested in activating the 3D Virtual Tour option for your website, please contact our Customer Care team.
We work with several integrated 3D tour platforms. Please see our help pages, link below the video to see a full list.
Follow the video to make the corresponding configurations:
You can create a pdf brochure of each accomodation with several images and the description in one or two languages.
The format can be either landscape or portrait.
This can be useful to print as a hard copy to promote an accommodation in a window display or to send as an email to a potential guest.
Follow the video to make the corresponding configurations:
Tags can be created in different parts of the system: accommodations, portals, owners, bookings and customers.
They can be used as a filter in several VRMS listings such as in the list of owners or in the booking calendar.
Tags are for internal use only and will not appear on the webpage or on portals.
Follow the video to make the corresponding configurations:
The rate is the base price we want to enter into the system to charge for a night of renting a property.
Rates are used in the system to calculate and set the price for a booking of an accommodation.
Depending on the configuration you have in your VRMS account, rates will be VAT included for European companies or without TAX for American companies (or other companies that work with the same model). On the right hand side, the system will let you know about your company configuration (print screens below). Should this not be the desired one, please contact our support team and request its modification.
Follow the video to configure the corresponding settings:
The rates can be fixed based on:
- 1. Price per night per property: for the whole property, with a minimum occupation and also a supplement per person, or
- 2. Price per person per night: a price for the whole property, with discounts per person for more or less (that is, we charge the maximum and discount an amount for fewer people).
The rate is always introduced, value per night, expect monthly where a fixed amount has been placed, and the system automatically divides by 30 and the result is the final price per night.
Follow the video to configure the corresponding settings:
Copy or Importing seasons is a trick that will help you save time by avoiding introducing new seasons manually, one by one.
It is important to choose the action correctly:
- Replace existing seasons - overwrite the current seasons for those imported from the chosen rate.
- Add to existing seasons - it will only add more additional seasons to those already existing in the current rate.
- By clicking on Import, the chosen seasons will be added.
Then you just have to enter each one, click on edit and modify the prices if applicable. Otherwise, click on accept and save.
Follow the video to configure the corresponding settings:
The rate can be used as a mode or as a rule in application for various accommodations. To add more accommodation to a rate, press the chain symbol, select the accommodations that you want to associate and finally press the button accept.
The advantages of using the rate rules is that by modifying a single rule, the rates of all the accommodations associated with the same rule are modified.
Follow the video to configure the corresponding settings:
Discounts and supplements allow you to modify the Avantio base rate in certain seasons or based on specific conditions.
Please note that an accommodation must always be associated with a rule, and within this rule, you can configure several seasons and/or application conditions.
You should check the compatibility of discounts and supplements with the portal in our documentation by clicking here.
Discounts and supplements, by default, are not cumulative. If two discounts are applicable in the same period and both meet the necessary conditions to be applied, the one with the higher amount will be applied.
Follow the video to configure the corresponding settings:
You can introduce discounts or additional costs according to the rate-base of each accommodation.
The procedure is very easy: just create a discount rule that includes one of several seasons and assign this rule to one or to several accommodations to those accommodations where you want to apply the discount.
Follow the video to configure the corresponding settings:
Discounts will be very useful to promote some accommodations standing them out on the website. The price will be highlighted on your web site: the daily price will be crossed out and the new one will be outlined in a new colour.
Supplements can be useful for short stay penalties. Besides, you can use them to get less restrictive rules of stay, i.e. to accept reservations of 3 days of stay in a high season but setting the price as the reservation was for 7 days.
Discounts configured in DAYS and FIXED AMOUNTS will not synchronise with the OTA's via the Channel manager. They will only be visible on your website.
Before you finalise your pricing strategy, please check the compatibility with the OTA's you are connecting to your account.
Follow the video to configure the corresponding settings:
From the Discount and Supplement list you will be able to see the different rules created, the accomodations assigned to each one, assign or unassign accomodations to each rule, view, edit and delete them.
Follow the video to configure the corresponding settings:
Avantio has developed partnerships with different Revenue Management Systems that we will shortly introduce. You can find all the information you need here.
Follow the video to configure the corresponding settings:
Congratulations!
You have successfully completed the first stage of implementing your Avantio account.
It is important that all the information related to this stage is configured before moving on to the next stage.
All the accommodations have their surface area configured.
All accommodations have well configured features: rooms, bathrooms, kitchen, customised extras, capacity.
The rates are configured for a minimum of one year.
VRBO: the descriptions of your accommodation are personalised and have a minimum of 400 characters.
VRBO: the titles of your photo galleries are longer than 20 characters.
Your domain is validated.
Remember that to find out which extras are synchronised with the portals and more details about the connections you can go to our knowledge base in the Channel Manager section and check what is synchronised with each portal.
Don't leave information to the last minute as there will be more configurations to be made in the next stage.
From the Bookings list you will be able to manage your bookings easily and search using different filters.
You will know easily, the status of the booking, the channel it came through, the total amount, the check-in and check-out dates and the name of the guest.
Follow the video to configure the corresponding settings:
Next you will need to add a manual booking
Remember to fill in all the fields to be able to better track your bookings
The amounts will be filled in automatically once you have chosen the accommodation and the number of occupants, however you can customize the amounts, add discounts/offers or include extras.
Follow the video to configure the corresponding settings:
Check here all the differents sections of the booking and hw you can personalize information.
Follow the video to configure the corresponding settings:
You will be able to manage your cleaning and services quickly and easily through this interactive module.
You will be able to see all the extras and services associated to the bookings with the date of application according to what is configured in each extra. The application time will be 00:00 by default.
You can make specific or mass changes related to the day of application of a service, time and status.
You will also be able to send messages to providers related to a specific booking.
Follow the video to configure the corresponding settings:
The occupation rules allow you to establish the most common restrictions for your properties e.g. the minimum number of days or mandatory days of check-in/check-out.
You can create different conditions for different seasons, e.g. in July and August you can apply a minimum stay of 7 days but 3 days for the rest of the year.
The system also allows you to define certain rules for one property only or several properties within a group.
If you do not define the occupation rules of all your properties, or if there is a gap in the calendar, it will not be possible to make bookings online.
Therefore it is very important that if you have different occupation rules per season that the sum of these rules cover every day of the year.
Follow the video to configure the corresponding settings:
It is important to emphasise that every accommodation must have an occupation rule assigned to it. It is possible to assign different conditions according to periods or seasons WITHIN that rule.
The correct way to set occupation rules is to create a rule per accommodation (or group of accommodations) and NOT by occupation condition.
For example, it is incorrect to create a “High season rule” or “Christmas rule” as these periods are seasons within the general rule “Occupation rule for Accommodation X”.
Follow the video to configure the corresponding settings:
This module allows you to establish key collection and entry instructions for your properties.
You can communicate with and provide full information to the guest by setting the rules on how to enter the property and the collection of the keys.
When creating the key collection rules, you should indicate:
- Check-in and Check-out times
- Languages spoken
- Where to collect keys
- Contact details for the day of arrival
- Any additional notes
- The customer service opening/available hours
Follow the video to configure the corresponding settings:
This module allows you to set instructions on how the guest can confirm and pay for bookings made through your website.
You can also set the cancellation conditions if a booking is cancelled before check-in.
This section also synchronises with several of the portals.
The booking conditions module allows you to:
- Specify what percentage of the booking is to be paid by the guest and when
- Choose the payment methods e.g bank transfer, payment gateway, credit card
- Specify beneficiary and bank account details for bank transfer payments
- Specify cancellation conditions
- Set different payment and cancellation conditions for each property or group of properties
The booking and cancellation policies appear on the property page on your website. This ensures transparency and gives the guest confidence when making a booking.
Follow the video to configure the corresponding settings:
The advanced settings are used to configure an exception to the mail rule:
- Configuration according to the booking amount
- Configuration according to the duration of the booking
Once you have added the method of payment for each step, you can choose to hide them according to certain conditions:
- Hide payment method according to X days
- Hide payement method according to the amount
Follow the video to configure the corresponding settings:
By default, the system will indicate that ‘the customer will ALWAYS lose a total amount of the pre-payment’. However, you can set other rules depending on the time left until check-in.
Follow the video to configure the corresponding settings:
The Availability Calendar section is the calendar where you can view all your bookings and quickly identify available dates or accommodations.
You can customise the colours that identify the status of the bookings by clicking on the "Planning configuration" button (it will take you to the company configuration page).
You can also create different categories for a better filtering of the accommodations and assign specific colours to them. Remember that planning categories do not affect other parts of the system and that an accommodation cannot be in more than one planning category at a time.
It is important to note that the Calendar only displays bookings and blockings from the last 24 months. However, you will always find the oldest bookings in the list of bookings.
Follow the video to configure the corresponding settings:
The new Revenue Calendar shows the bookings in a different way than the availability Calendar, as each one has a specific function.
You will have to consider the Revenue Calendar as occupied nights vs. free nights.
This also leads to certain actions that you will have to do in one planning or another, for example, if you want to customise the colours of the booking status, you will have to use the availability planning.
You will be able to see to the right of the accommodation name the occupancy rate of that particular accommodation. If you click on the graphic, the system will show you additional information about the period taken into account, explanation of the calculation and booking status that are taken into account for the calculation.
The free cells show information about the rate and occupancy rule for each day and the cells with bookings show the total amount of bookings.
Follow the video to configure the corresponding settings:
From the Revenue Calendar it is possible to perform several actions. The available actions will depend on whether the cell has a reservation or not.
When clicking on a cell with a reservation, the system displays the information about the revenue, expenses and sales margin of the reservation.
However, clicking on a cell without a reservation will display the functionality of the configuration panel from which you can change the rates and occupancy rules and consult the history of changes.
If there is no current rate but there are previous rates already configured, the system will show the configuration panel.
By right-clicking on a cell without a reservation, the system will display the details of the rate, associated discounts and supplements and the occupancy rule. For more detailed information, you will find a direct link to these rules.
Follow the video to configure the corresponding settings:
With these two tools, you will be able to optimise your Revenue Calendar.
Orphan nights
As your occupancy rule prevents bookings for periods shorter than those set in your occupancy rule, the Revenue Calendar helps you to easily identify orphan nights and to adapt the occupancy rule so that your accommodation can be booked in search engines.
Orphan nights are displayed in the Planning Revenue with a yellow triangle.
You should take into account if your accommodation shares a photo gallery, or a rule with other accommodations and other details that you will find in the video.
ADR (Average Daily Rate)
Measures the average rental price of sales during the stay of the bookings.
It is calculated by dividing the total revenue over the total number of occupied nights.
It takes into account the rental price with discounts and supplements but does not take into account the price of extras, if any.
Follow the video to configure the corresponding settings:
The system comes with more than 30 preconfigured templates that you can manually customise and adapt to suit the specific needs of your agency.
There are several categories available and within each category, you have a selection of templates to choose from.
We recommend that you use the preconfigured templates as a base and then edit or customise the document to your liking.
Follow the video to configure the corresponding settings:
As it is much easier to to work from an existing template rather then start from scratch, we always recommend you duplicate an existing template and then modify it to suit your needs rather than creating a new template.
Follow the video to configure the corresponding settings:
In certain circumstances it may be necessary to create a new template rather then working from a pre-existing one.
Before you use this option, check to see if it would be easier to use a similar existing template, duplicate it and then edit.
Follow the video to configure the corresponding settings:
Once you have duplicated the template you are ready to start editing, safe in the knowledge that the original is still in the system in case you need to use it as a base for duplicating another template.
The templates are made up of text, fields and blocks, which can all be edited
Fields are single pieces of information extracted from the VRMS which change according to the communication being sent and are indicated by a word with a box around it.
Block are as the name suggests a block of relevant information - e.g. Booking information.
We have several predefined blocks in the system and you can also create your own block with text, fields, tables, images, logo, etc.
Follow the video to configure the corresponding settings:
You can add:
- Free text
- Fields from the database
- Blocks
- Company logo
- Images
- Maps
- A signature field
- A button with customisable style and URL
Follow the video to configure the corresponding settings:
The great advantage of the template system is that, depending on the language of the guest, the system will automatically select the template in the appropriate language.
Follow the video to configure the corresponding settings:
Harmony is an email and task automation module that will allow you to save time by automating emails and tasks in the daily management of your properties.
When you open the module you will see three tabs: Dashboard, Solutions and Tasks.
Follow the video to configure the corresponding settings:
Harmony is a module that allows you to automate tasks and save time in your day-to-day management.
Solutions are divided into three categories, in this unit we will talk about the customers category.
This category has three options available:
- Offer additional services or send instructions to the tourist
- Get more guest reviews
- Reward guests who have left a review
You should name the solution to identify it easily, select the status of the booking in which the task must be automated, the time of execution, the sender and recipient and the template to be sent.
Don't forget that tags can help you segment the communication you want to send.
Follow the video to configure the corresponding settings:
Follow the video to configure the corresponding settings:
In the bookings category you will find one or two solutions available, depending on whether you have an Avantio website (or online booking engine integration)
Using the solution "Automatically confirm bookings with direct payment from your website" the system will change the pre-booking status to confirmed automatically and send a confirmation email.
Follow the video to configure the corresponding settings:
In the "Manage bookings with pending payments" section, you can send a reminder to the guest to make a payment.
This solution will be sent if there are pending payments on the booking.
Follow the video to configure the corresponding settings:
You can create a solution in the owners category to inform the owner when they have received a new booking.
Follow the video to configure the corresponding settings:
Tags can be used to segment messages sent via Harmony.
In Harmony you can use the tags from bookings, accommodations, owners and portals.
In this way you can personalise your automated messages according to the tags you add.
E.g. If you tag an owner as "VIP" and insert this tag into the Harmony solution, the system will only send notifications to bookings that are associated with owners that have a "VIP" tag
Follow the video to configure the corresponding settings:
The Opportunities module will allow you to create proposals based on the needs of the guest by choosing the location, dates of stay, type of accommodation, occupants, number of rooms, additional features and budget of the guest.
You can send the proposals by email and if you have an Avantio website or booking engine integration, the guest can go ahead and book using a direct link to the accommodation file on your website.
The sending of a proposal does not block the calendar.
Follow the video to configure the corresponding settings:
Unified Inbox is a tool which allows you to centralise your communications with all the stakeholders associated with a booking in one place.
With Unified Inbox you can easily communicate with different guests in a booking, with the owner and also with the different providers associated with a booking.
Unified Inbox facilitates seamless communication between the agency and the other entities associated with the booking which can be the guests, the owner and the providers.
It's possible to send either a quick chat message or use a template to send more detailed information.
Follow the video to configure the corresponding settings:
Use the list of owners to keep all of your owner's details in one place.
You can filter the list of owners and add tags to create different categories of owners in order to personalise the communications they receive via Harmony.
Follow the video to configure the corresponding settings:
With this module, your owners will be able to consult information about their reservations without having to contact the agency.
Improve your relationship with your owners while saving management time.
You will be able to give individual permissions to owners so that they can only see the necessary data.
Follow the video to configure the corresponding settings:
In this section you can generate the owners' contracts and keep track of their validity You can manage and control how much and when to pay the owner as set out in the contract. The program will automatically notify you when you have to make a settlement.
To begin, fill in the general information where you will find the fields necessary to identify the owner and property, date of registration, date of validity of the contract, if you want automatic renewal of the contract, the business name and the contract number.
Follow the video to configure the corresponding settings:
In this type of contract the agency acts as if it were the owner. The managing company bills the amount of the reservation to the tourist. The owner receives the amount set out in the contract for leting out their accommodation (and it is usually the owner who invoices the agency).
To begin, fill in the general information where you will find the fields necessary to identify the owner and property, date of registration, date of validity of the contract, if you want automatic renewal of the contract, the business name and the contract number.
The program allows you to set payments to the owner in 3 different ways:
- Payments per reservation: you can set a percentage of the rent or a fixed value per day
- Fixed Payments: a fixed amount per month or other period
- Combination: A combination of payment per reservation and fixed payment
Follow the video to configure the corresponding settings:
An intermediary contract is a type of contract in which the property manager charges a commission for its mediation services. The owner receives the total booking amount minus the agency commission.
The program allows you to set up payments to the owner in 3 different ways:
Commission per booking: You must set agency's commission for its intermediation services as a percentage of the rental amount. You can choose the corresponding VAT/tax, which will be added to the amount set in the % of the rental amount.
Fixed payments: A fixed amount is set according to defined payment dates e.g. monthly, quarterly and the system calcualtes the yearly total.
Combination: You can apply a combination commission per booking and fixed payments.
Follow the video to configure the corresponding settings:
One of the advantages of the system is that it automatically alerts us when there are outstanding settlements.
But for this to function correctly we must indicate two things in the contract:
At what point of the booking process will the system calculate the settlement to the owner?
Booking date, check-in or check-out.
What dates do we make the settlement to the owner?
>Every time there is a booking, once a month, or other specified dates.
Follow the video to configure the corresponding settings:
The advanced options allow you to calculate exactly the amount to be taken in to account when settling bookings. You have 6 options:
- Deduct the portal or agent commission
- Pay extras to the owner
- Include expenses charged to the owner
- Deduct portal (also known as OTA ) commission (e.g. Airbnb ""Host fee"")
- Establish a guaranteed minimum payment
- Include VAT or tax in the rental amount
Follow the video to configure the corresponding settings:
In this section we can set the tax rate that should be applied to your contracts.
E.g. The VAT/tax to be applied to your commission or withholding tax if applicable.
The options available will depend on which type of contract you choose - Direct sale or Intermedary.
Follow the video to configure the corresponding settings:
In this section can block periods not included in the contract. If you activate this option in the system, the calendar will be blocked for this accommodation for the periods not covered by the dates of the contract.
You can also reserve specific dates for the owner if they have regular periods when they want to use their house. You can add these periods here so that they will be created as owner bookings.
Follow the video to configure the corresponding settings:
In this section you can set the template you will use for the contract as well as the one you will use for the settlement.
The special conditions field is an optional field which allows you to add special conditions specifically for this contract. The text will appear after you print the contract.
Once saved, you can duplicate a contract to create further contracts for properties with similar conditions.
You can change the contract at any time but these changes will not affect settlements already created in the system or bookings already settled.
Follow the video to configure the corresponding settings:
Now that contracts are set up you can settle your bookings.
In the Settlement section you will find the accommodations pending settlement where the system will show you the settlements pending in accordance with the conditions set out in the contract with the owners.
You can preview the settlement where you will see the owner's bookings payments, fixed payments or both as the case may be, the owner's expenses and payments on account if any.
You can choose whether you want to settle all or just some bookings, as well as whether you want to include all or some of the expenses and/or prepayments in the settlement.
Follow the video to configure the corresponding settings:
In this section you can make a specific settlement by filtering by owner or accommodation.
By default, paid and confirmed reservations will be taken into account. You can also include or filter cancelled bookings if you need to.
Use the filters provided to find the bookings you want to settle.
Follow the video to configure the corresponding settings:
This section lists both paid and unpaid settlements.
Use the filters to find the settlements you need.
The "Payment Date" column will indicate if the settlement is already paid or not.
You can quickly change the status of an unpaid settlement to be paid. If you have made a mistake when settling you can delete the settlement and do it again.
Follow the video to configure the corresponding settings:
In this section we can keep track of all expenses we pay on behalf of the owner.
For example repairs, replacement of damaged fixtures and fittings, maintenance, etc.
It allows us to control the expenses we have paid which will then be detailed in the settlements and deducted from the amount payable to the owner.
We can also create recurring monthly expenses and divide expenses between two or more properties.
Follow the video to configure the corresponding settings:
Prepayments or Payments on account are payments made either by the agency to the owner, in which case they are deducted from the amount payable to the owner.
Or by the owner to the agency to cover certain expenses related to the property, in which case they are added to the amount payable to the owner.
Follow the video to configure the corresponding settings:
This section provides you with quick access to create or modifiy your invoicing data.
You can also configure the serial and numbers of documents to be issued via the Avantio system.
Please note that you will not be able to delete a legal entity name if you have already created documents associated with it.
Follow the video to make the corresponding settings in your account:
The invoice rule will tell the program how to create invoices in the system - i.e
The amount to calculate, what VAT to apply, who to invoice, etc.
You can assign an invoice rule to one or more accommodations, depending on your needs.
You must name the rule, choose the business name to issue the invoice and the tax to be applied, if any.
Please note that the tax that you apply in the invoice rule of an accommodation will be the one that the system will take into account when registering a booking in the system.
You will also need to choose the base for calculation of the invoice: Total rent without taxes, a percentage of the rent, total rent minus the amount paid to the owner or the booking total minus the payment to the owner.
You can also invoice the extras if you need to, choose if you want to invoice all or only some extras and if you want to invoice the total of the extra or only a percentage.
Advanced options allow you to refine the amount of your invoices.
Follow the video to make the corresponding settings in your account:
You can issue invoices for extras and services in the system without having to create a booking.
Use this section to create invoices for extra occupants, expenses to the owner, etc.
The system is flexible in that you do not need to associate these invoices with a booking.
Follow the video to make the corresponding settings in your account:
In this section you can view, filter, print, export or email all invoices or receipts issued and stored in the system. You can edit certain details of a issued invoice.
You can also delete an invoice from the system but you must bear in mind that this can cause gaps in the series and numbers of the invoices that you must solve manually.
Follow the video to make the corresponding settings in your account:
List of payments received:
In this section you can see a list of all payments received in a certain period.
List of outstanding payments:
This is a list of pending or outstanding payments to be received and the number of days they are outstanding.
List of payments made
This section displays the payments made by the agency to the owners and to the guests e.g. owner settlements and booking/security deposit refunds.
List of payment to be made
This is a list of payments the agency needs to make to the owners and the guests, either settlements or booking/security deposit refunds.